
Notes
Colour Pencil Techniques

Many people use colour pencils as children but leave them behind once they grow up and more exciting mediums become available. Colour pencils can be rather hard and, if cheap, limited in pigment range. However, over the past twenty years colour pencils have been marketed more towards artists. This means the quality of them has improved a lot, brands like Faber-Castell, Derwent or Prismacolor have developed new types of colour pencil, with Polychromos Pencils using oil instead of wax, to create new vibrant colours.
The great advantage of using colour pencils, the aspect that makes them definitely worth trying, is they are very easily portable. Watercolour paints are awkward to carry outside. The water always spills, the colours get tiny insects floating in them. Oil paint is even more difficult. Pencils are a lot easier, much more portable and modern pencils make it possible to render the most beautiful greens and browns.
Colour pencils include non-water soluble, water soluble and waxed based varieties. Colours can be mixed by layering the pencil marks on top of each other. Soluble colour based pencils are often used with watercolour paints to give a variety of effects.
There are three basic techniques for applying colour pencil.
Layering
This technique is the most useful to use with colour pencils as it is the way of mixing colours. Colour pencils are translucent, like watercolours, so each new layer changes the colour of the previous ones. Put red over the top of a layer of yellow, for instance, and you will have orange. Layering also allows the picture to have more depth than it would if it was all just one layer.
It is important to put each layer down smoothly and evenly so it doesn’t disrupt the one put on top. For this I find it best to lay marks down using small half circles or eclipses so the marks blend into each other giving a smooth effect. Test the colours out on a scrap piece of paper first before applying to the picture.
Working from dark to light is possible with Faber-Castell – Polychromos pencils as, to a certain extent, errors can be rubbed out, but I don’t advise it, certainly not for a beginner. The translucency of the lighter colours will not show when put on top of darker ones. Be very careful to leave the white of the paper where the highlights need to be. Press heavily for strong darker colours and less heavily as the colours get lighter.
Burnishing
This involves pressing very heavily over layers of colour to pull them together. It makes a picture look more like a painting. This can be done using a clear blender pencil or the lightest colour pencil in the selection you are using for that drawing, for instance white. Make sure you push down heavily, pushing the pencil layers into the paper so it gets a paint-like quality.
Underpainting
This technique can be used to cover large areas quickly before putting layers on top, or as an initial colour to give a particular feel to an object as other colours are painted on top. I often like to give a wood a yellow underpainting to begin with, to give the picture a sense of warmth.
A wash can be done with watercolours but this means the paper will buckle and the surface will have a crispness that is not so suitable for dry colour pencil.
Alternatively use a solvent applied with a cotton swab. The solvent melts the binder that holds the pigment so that it goes into the paper. This stains the paper and dilutes the colour so the wash is of a paler colour once dry.
Try out colours with a solvent on a scrap piece of paper before adding to your picture as solvents can dramatically change the colour.
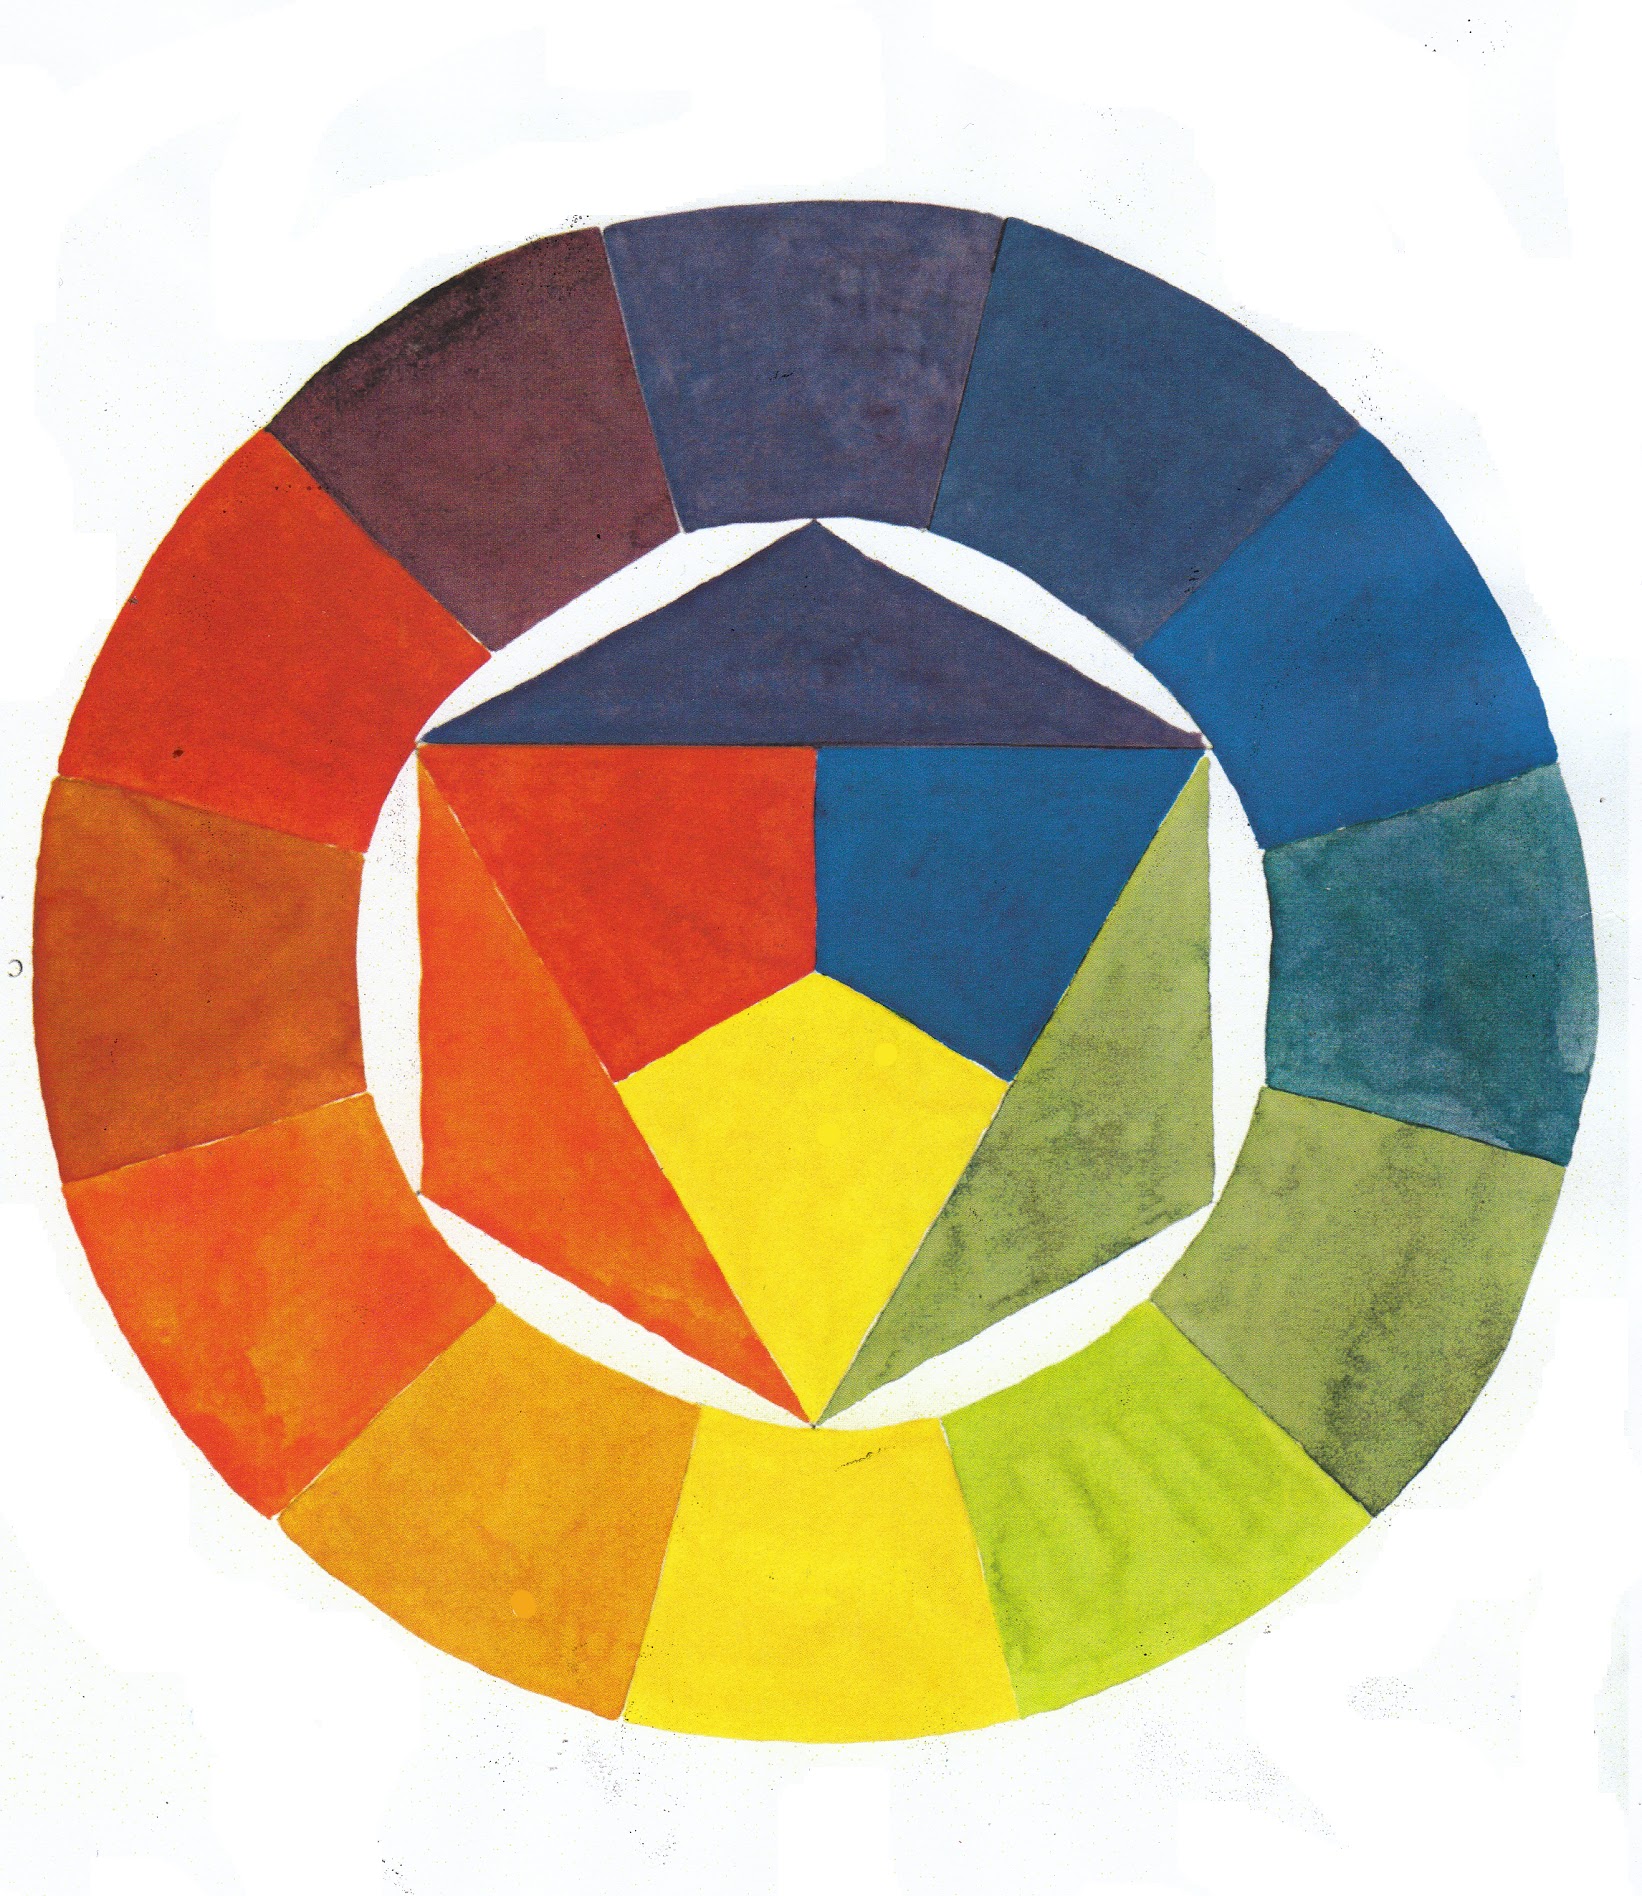
Johannes Itten’s Bauhaus 12 hue colour circle
Textures with Watercolours
With watercolour you don’t want actual texture but you do want to be able to get the illusion of texture. There are many possibilities with different techniques to achieve the look of the texture of a plant and of course they can be combined to create different effects.
Some particulary effective techniqures to use are : Sponge, tissue, salt, toothbrush, paintbrush flicking, wax.
Below are a few textures I’ve created using a mixture of techniques.


Sponge and toothbrush flicks over light green/grey wash
Layers of wash left to dry, then re-wet and scrubbed with a tissue
Two layers of grey to produce a dark wash then yellow ochre and Crimson sponged on top
Toothbrush dragged and flicked over a grey wash
Knife scrapping layers of dark grey
The Structure of Flowering plants
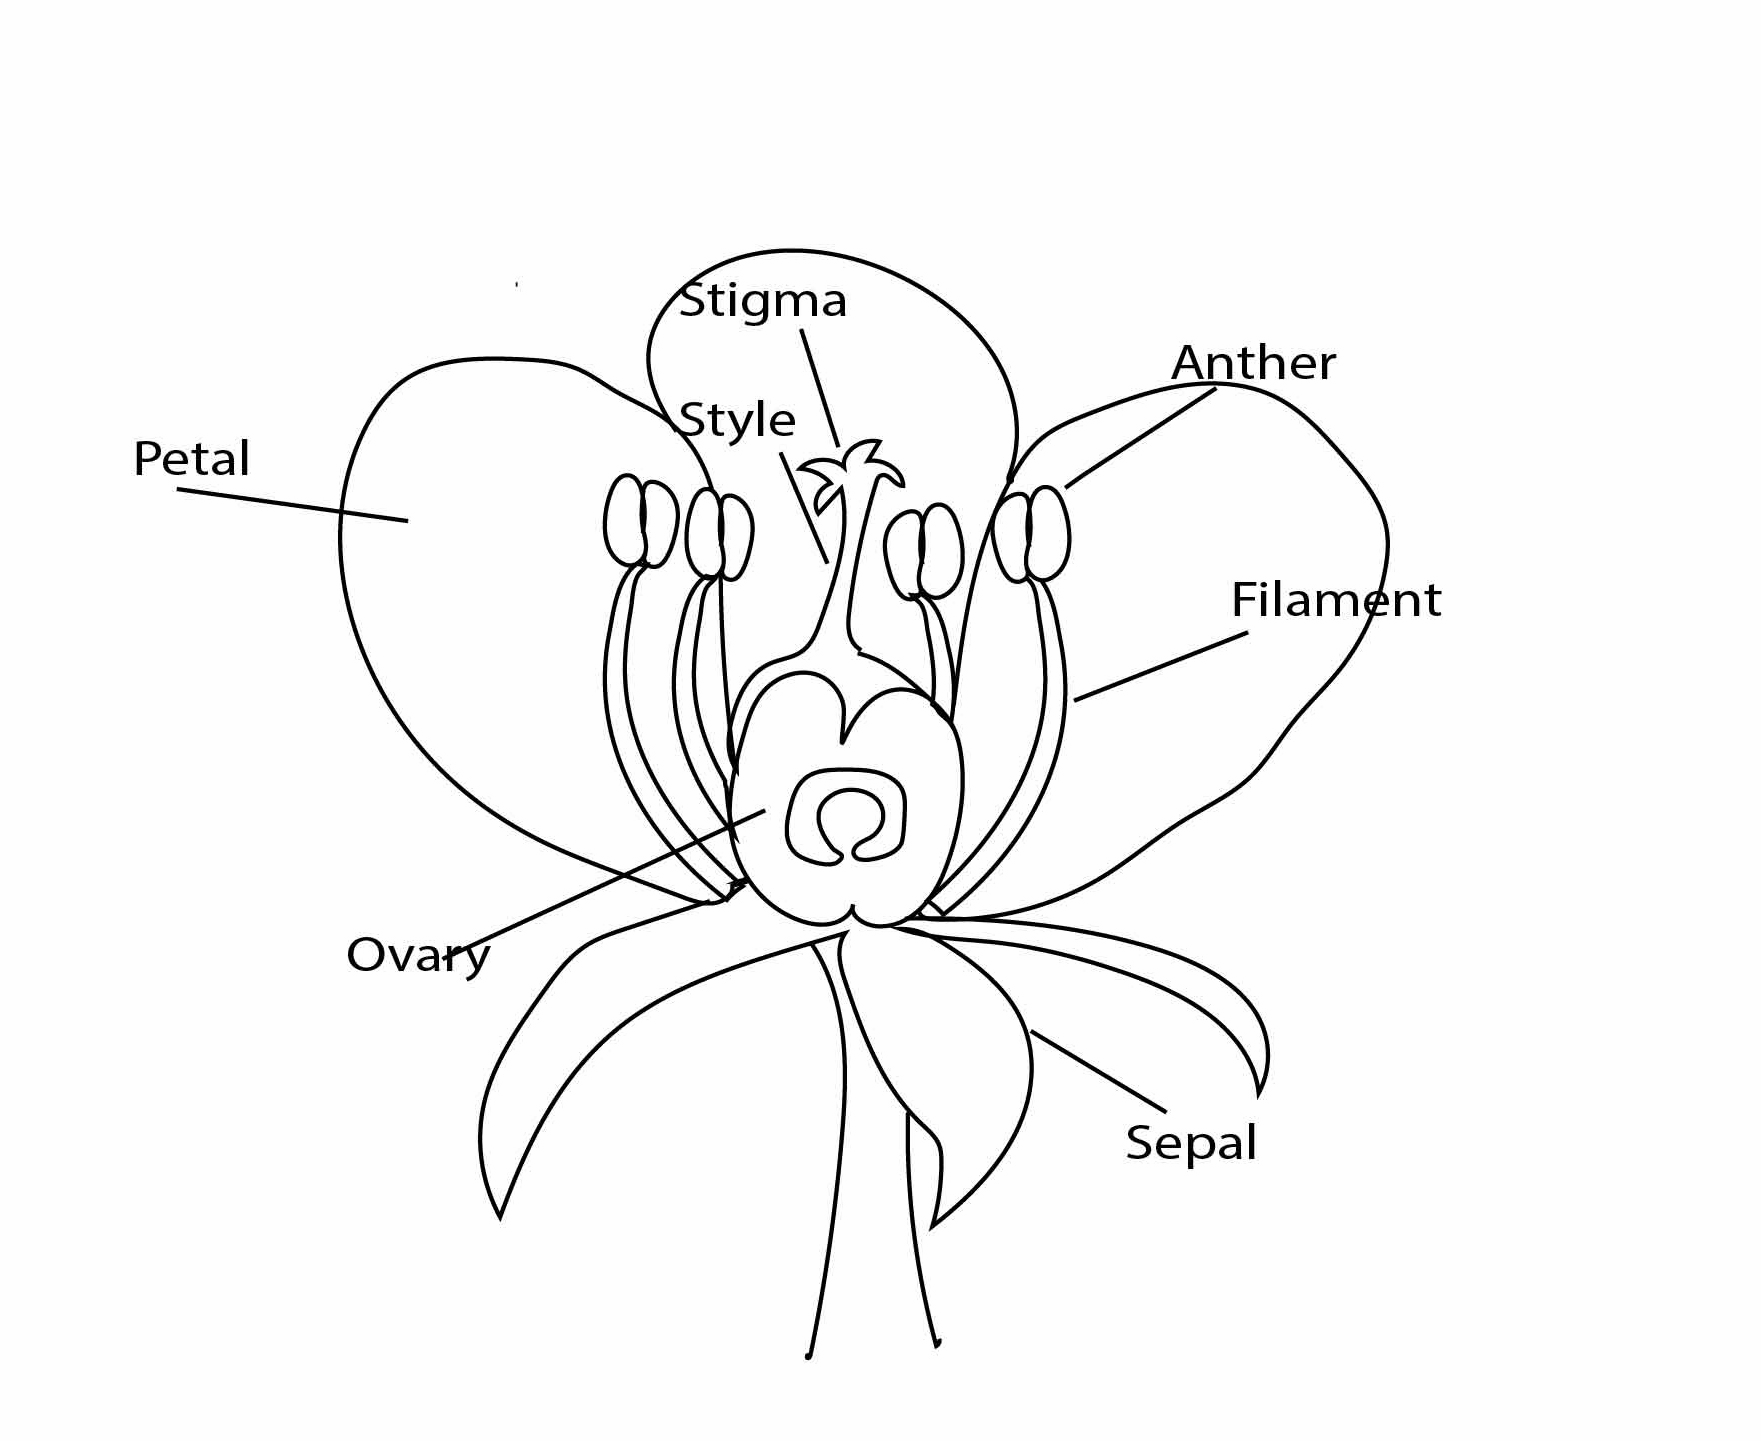
The anther and the filament together form the Stamen, the male reproductive part of a flower. On anther holds the pollen, the male reproductive cell.
The stigma, style, ovary and ovule form the female reproductive parts. The stigma receives the pollen during fertilisation.
When ripe pollen from an anther of another flower of the same species catches on the stigma, each pollen grain sends out a tiny threadlike tube. The tube grows down through the style and pierces one of the ovules in the ovary. This process is called fertilisation.
Watercolour Techniques – layers
“A wash is a term for a visual arts technique resulting in a semi-transparent layer of color. A wash of diluted ink or watercolor paint applied in combination with drawing is called pen and wash, wash drawing, or ink and wash.” Wikipedia
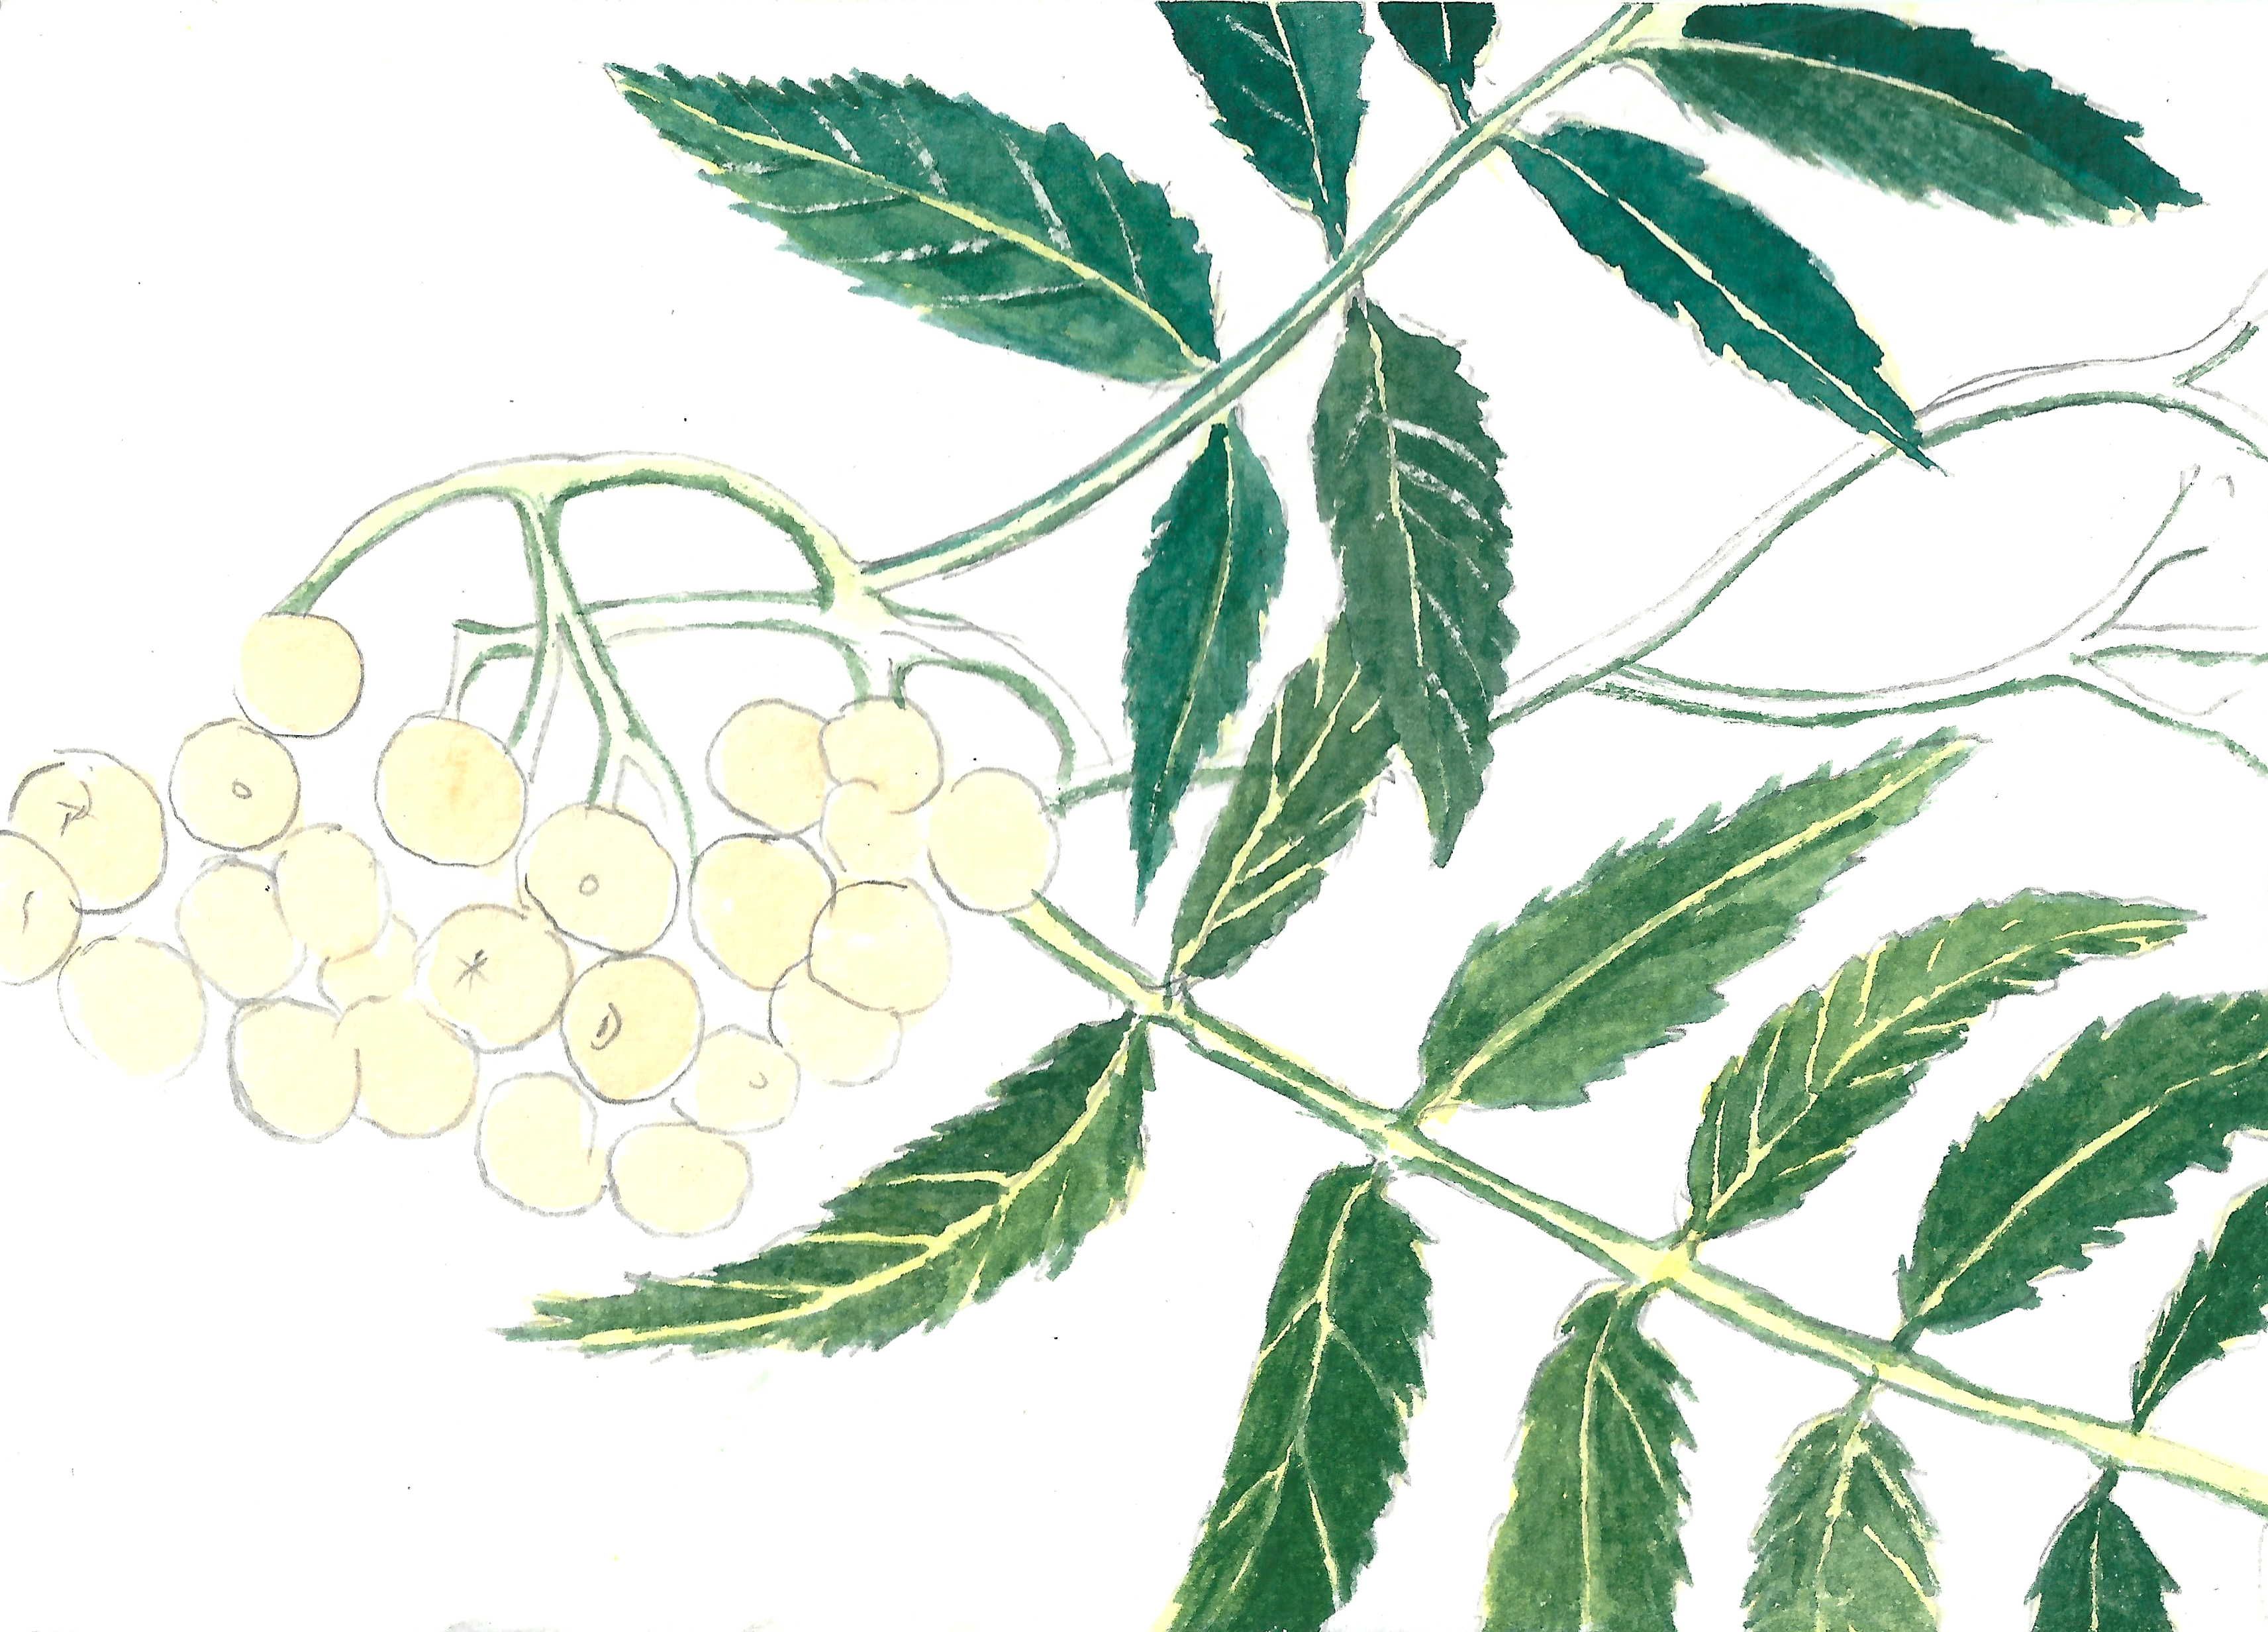
Often when watercolour artists talk about a “wash” they mean the large wash done in landscape paintings, but in botanical art a wash is the initial colour that determines the lighter parts of the painting and may be just done over the leaves for instance. it is good to use a fairly wide flat brush to avoid lines showing and to use enough water but not too much, dry it slightly on the side of your water jar before putting it on to your paper.
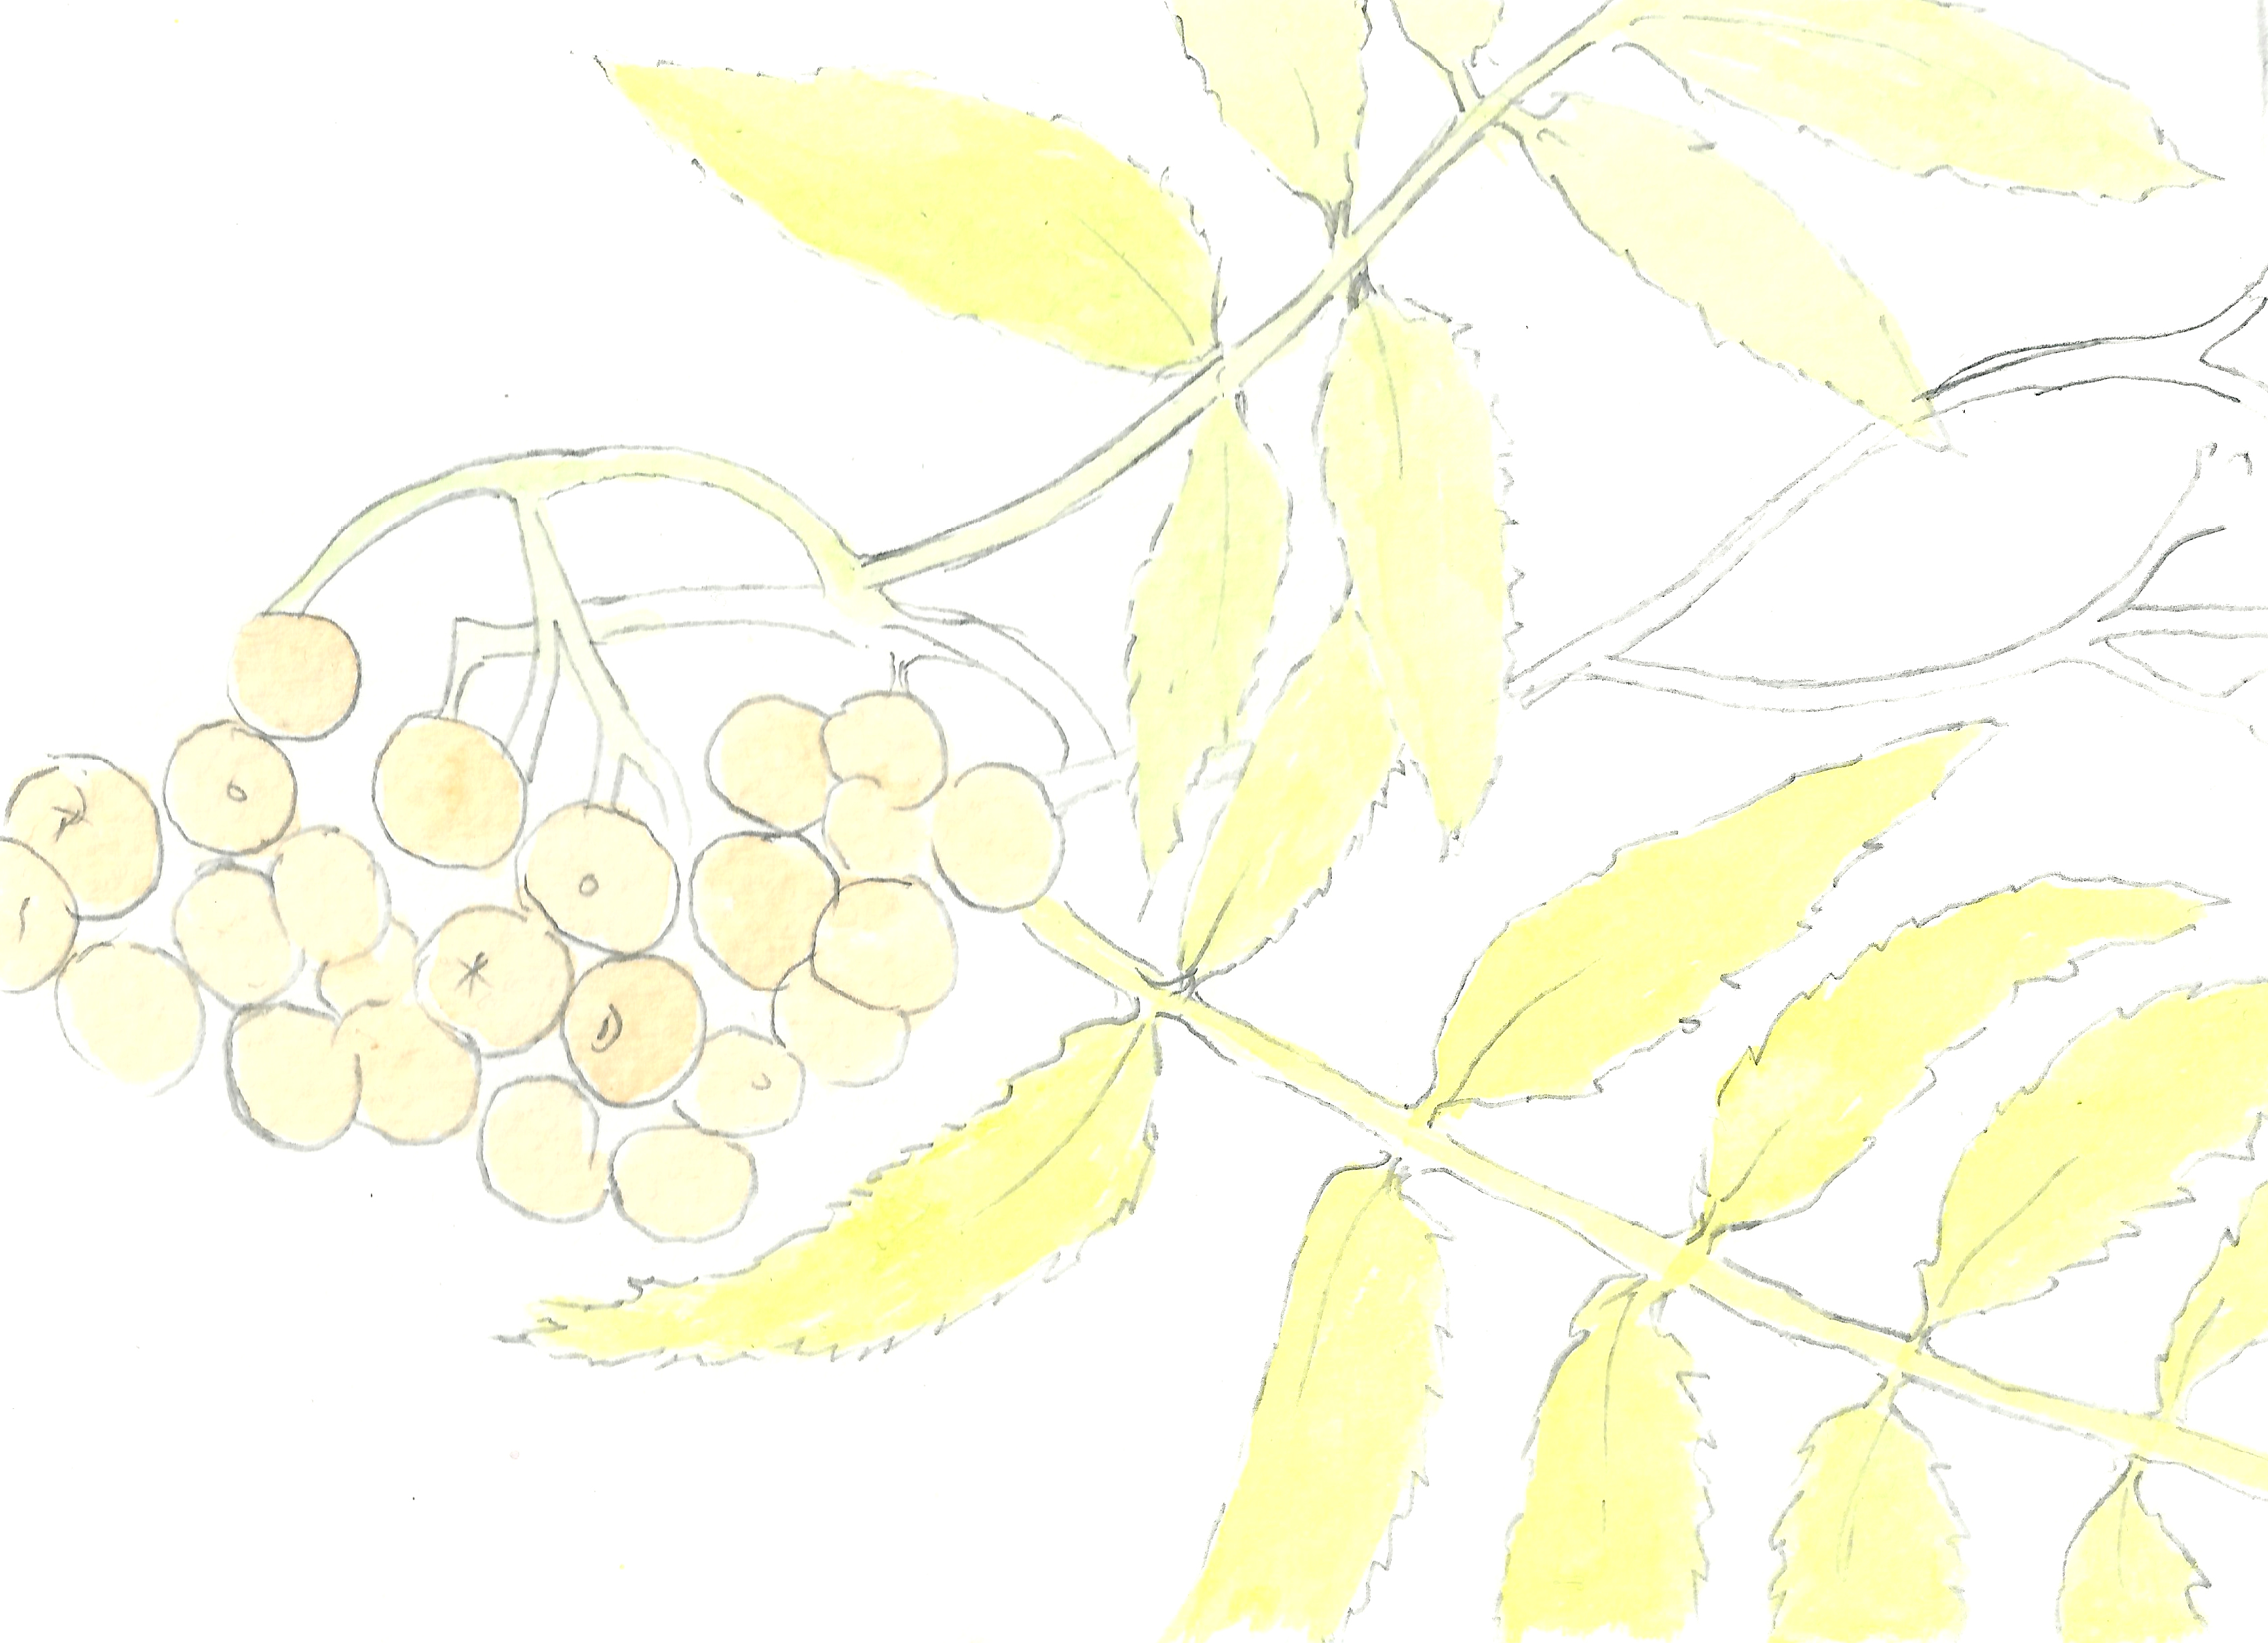
Here there has been a lime green wash painted on the leaves and an orange painted on the berries. It is then left to dry completely before anything else is painted on top of the wash.
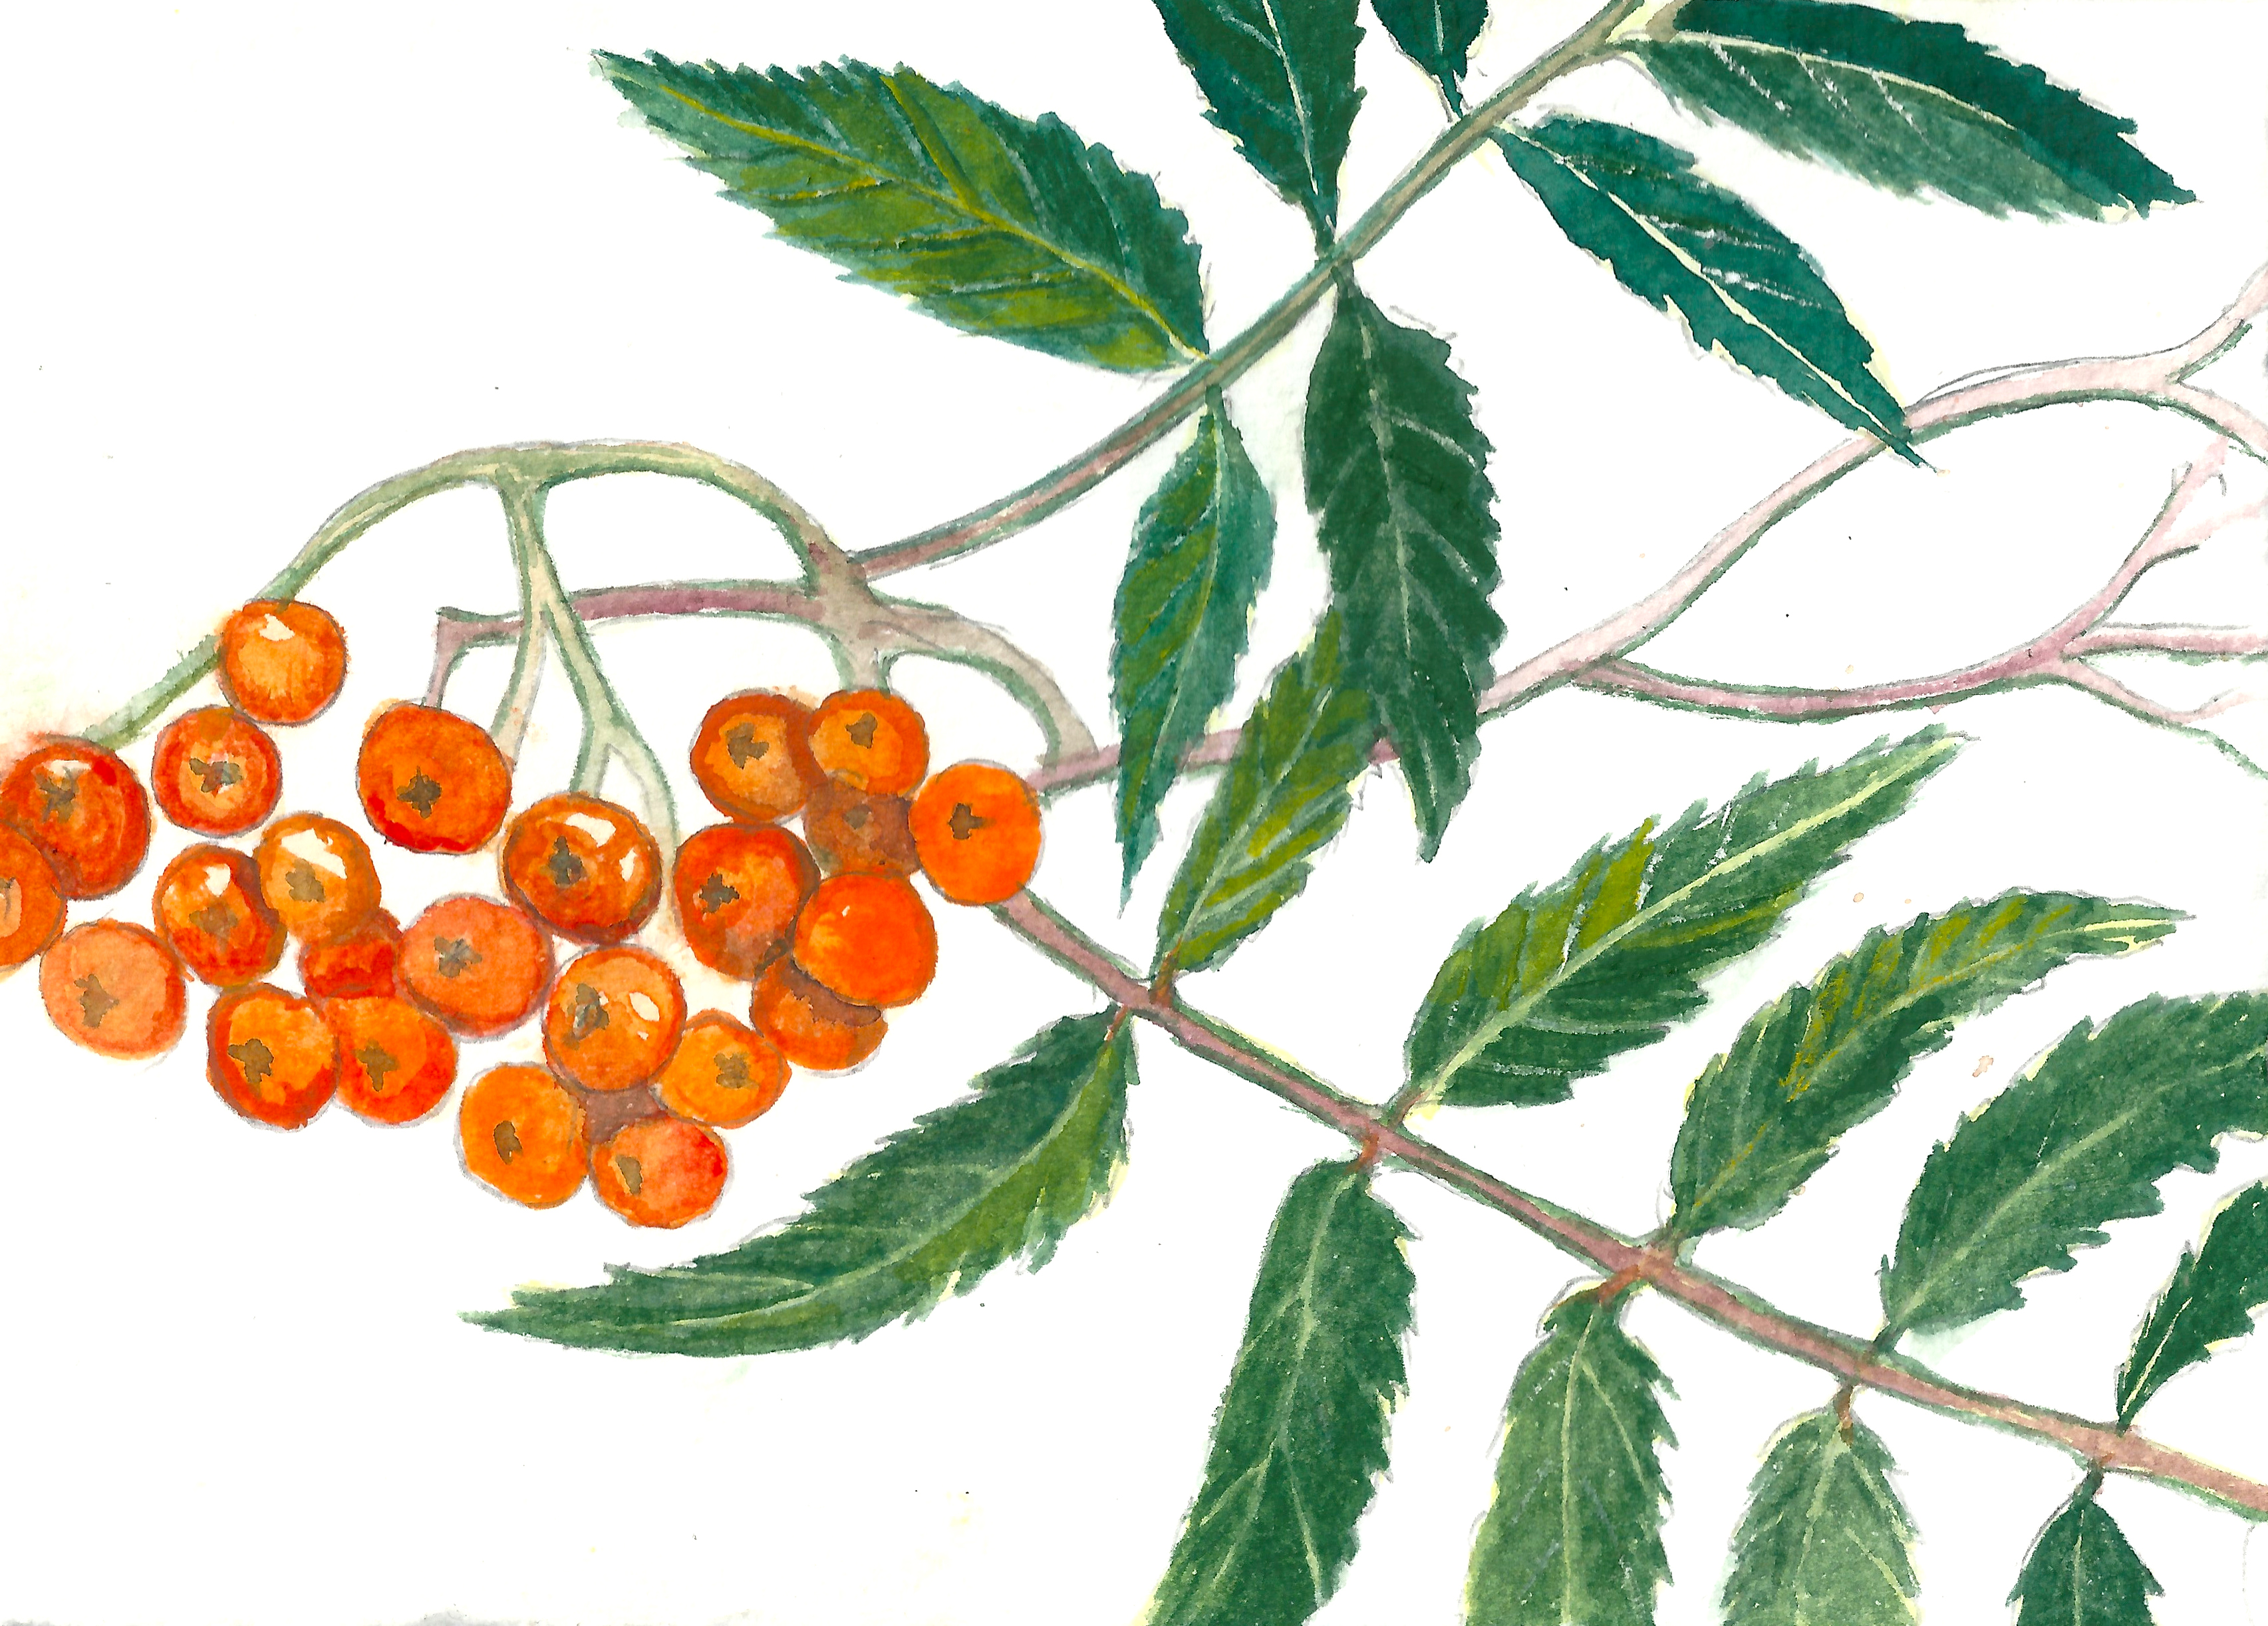
Watercolour paint becomes more controllable with less water, so much so that one can paint fine detail easier with watercolour brushes than one can with a colour pencil.
Once dry another layer of much darker green is painted over the first wash leaving gaps for the veins to show.
Colour
There are so many variations and shades of colours in nature that finding the exact colour for the subject you are painting can seem impossible. It is therefore good to start with getting a strong grasp of the basics of colour theory. Few people can instantly match colours but with an understanding of the colour wheel and practice of mixing, alongside careful observation, you will become confident in your use of colour and able to mix colours you see in nature with ease. Many of us have studied a bit of colour theory during school, but although it is lodged there at the back of our brain it is often difficult to retrieve it again when you are mixing colour for a painting so it is good to go over it all again.
Primary Colours
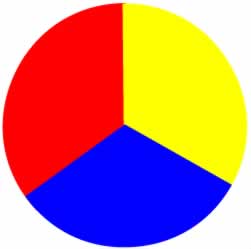
Primary Colours
Draw a circle and divide it into three sections as above. One section paint yellow -try lemon yellow or cadmium yellow – another section paint blue – try an ultramarine blue or Prussian blue – and the third section paint red – Alizarian Crimson or Rose Madder.
Red, blue and yellow are the primary colours from which all other colours come.. These are the only colours you really need to mix all the colours of the rainbow. Be careful though, for although that is true when dealing with light, when it comes to the material pigment there is slightly more to consider. Red for instance, when mixing using the colour wheel always use a cold slightly bluish red such as Alizarin Crimson or rose madder. This is because reds such as Cadmium red are slightly orangey and warm, giving a brownish shade when mixed. It can be good to look at your colours in respect of how warm or cold they seem, the warm shades will tend to eventually mix to warm browns, where as the cold colours will mix to cold greys. This can really help you choose which colours to mix when trying to achieve a particular colour.

The secondary colours are orange, green, and violet. Orange is mixed from red and yellow. Green is mixed from yellow and blue. Violet is mixed from red and blue (see diagram). In orange there is no blue, it is just red and yellow, so blue is the complimentary colour. Green does not include red so red is the complimentary colour. And violet doesn’t include yellow so yellow is the complimentary colour. These complimentary colours can be very useful when painting, in equal measure they can be very contrasting, but with one bright and one darker, for instance, they can appear very complimentary. You will see complimentary colours are used a lot in nature, many flowers and plants use them to attract insects.
Exercise.
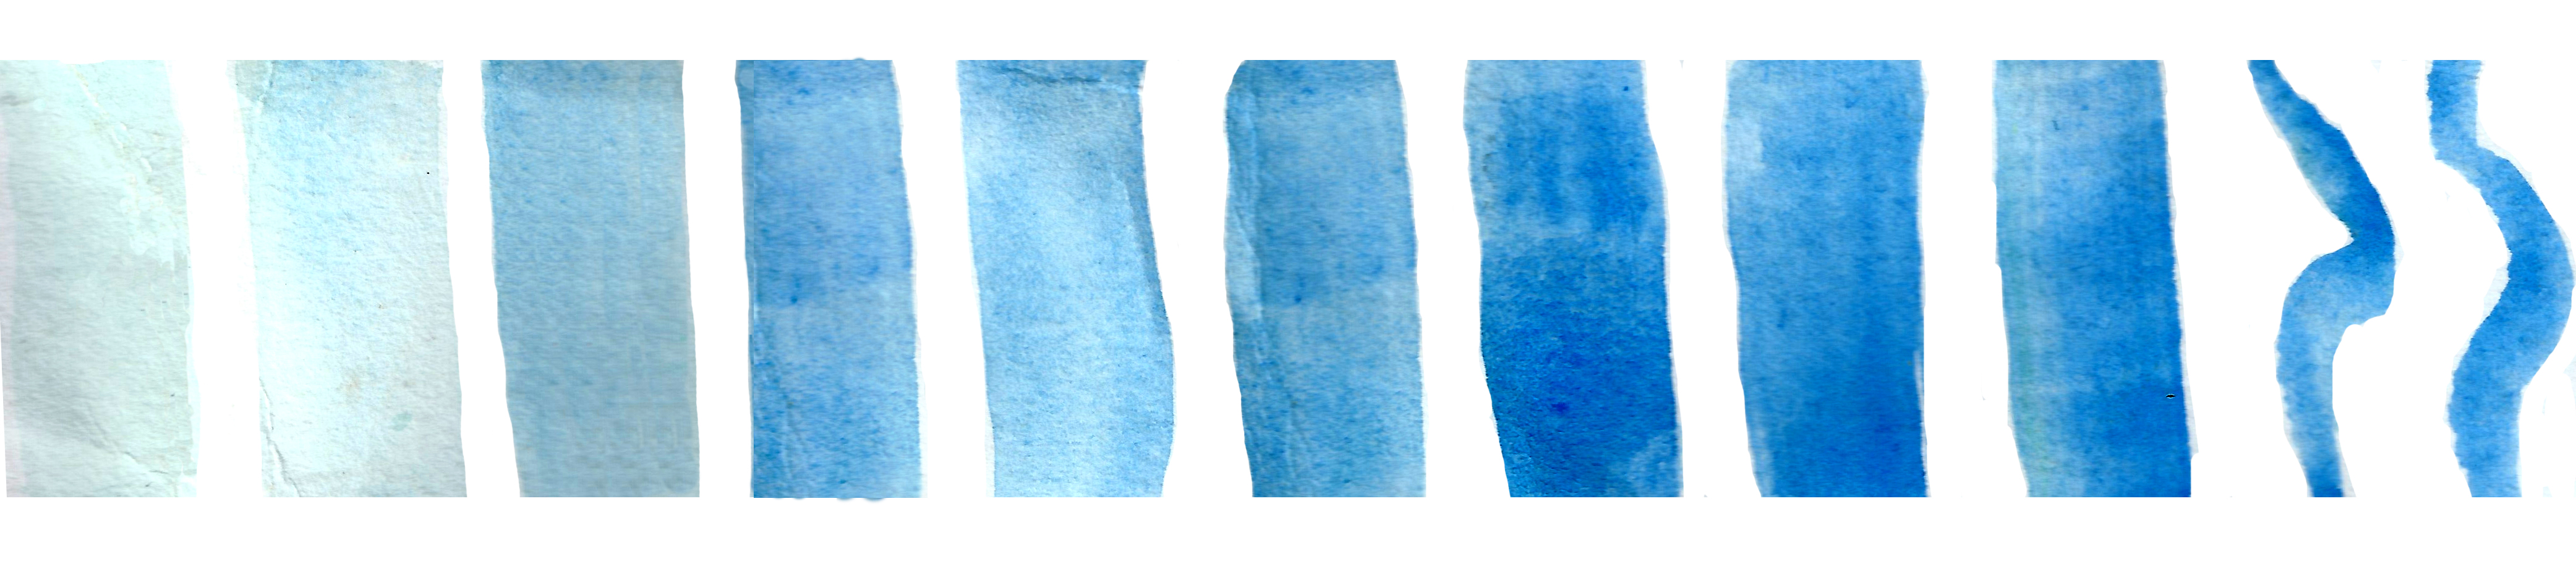
Take a red crimson colour and put a square of it on the left hand side of your piece of paper. Now add a tiny amount of yellow to the original red and paint another square next to the first one. Then wash your brush and add another bit of yellow, as before paint another square next to the first two. Your colour should gradually be getting more orange. Carry this along the page till the colour you have is almost yellow. If your colour is getting muddy change your water, clean your brush, and check your red is a cold red and not a warm one (as mentioned above). After you have completed this stripe repeat again but this time using a different type of yellow, maybe a cadmium yellow instead of a lemon yellow, and see the colours you get. You will notice that just from these three tubes of paint you can mix a large variety of oranges. Try it again but this time picking one yellow to keep and choose a different red. It is a good idea to keep the names of the pigments next to them on the paper so you can use it as reference in the future. Now repeat that whole exercise using blue instead of yellow. This will give you a whole series of purples. Learning how to mix colours with this type of organised mixing can improve your painting immensely, making it much more likely that you will achieve the colours you see in nature.
Green
The people of the rainforest have very many words for green. If you walk into a wood in the summer and look up you can understand why. In nature there are so many different greens. A ready made green brought from a shop is rarely accurate to portray a green in nature. A ready made green can often look garish and false when applied directly to the paper. It is therefore important to learn to mix greens.
Exercise mixing greens
Start by putting some lemon yellow in your palate. Using a soft flat brush put a sample of it in the top corner of a sheet of paper.
Clean your brush in water and take a very small amount of cobalt blue and add it to the lemon yellow. Put a sample of this next to the original yellow on your paper.
Repeat the last stage again adding a little bit more cobalt blue to the lemon yellow and add another sample alongside the previous two.
Continue this along the page with the greens getting increasingly bluish until the sample you have is almost completely blue. Label the sample Lemon yellow and cobalt blue

From yellow gradually adding more blue
Repeat this exercise all over again but instead of using cobalt blue use French Ultramarine. Remember to label the names of the colours next to the samples so you can use it for reference later. Do another sample strip using Prussian blue. Now your sheet of paper should start to show the huge variety of greens it is possible to mix. Carry on the exercise doing a sample strip using all the different blues in your palate. Once you have done that choose one of those blues to keep the same and instead try all the different yellows you have, try cadmium yellow, yellow ochre, Indian yellow.
Make sure your water is clean and if not change it, you will get muddy unintended colours if using dirty water.
When painting natural objects you may find the greens you mix are a bit too bright. Improve this by adding the very tiniest drop of red to bring it down a touch, try Alizarin Crimson or Rose Madder. Be gentle though, you will be surprised at how the smallest amount can change the colour. Red is the complimentary colour to green, on the other side of the colour wheel, add too much to the mix and you’ll end up with a brown or grey. These can be used to good effect in shadows. Try a little scarlet to mute your green, a little purple to darken it.
Browns and Greys
Browns and greys are what you get when you mix all three primary colours together. If you mix warmer shades such as Cadmium Yellow and French Ultramarine, Alizarin Crimson and Lemon Yellow, Prussian blue, you will tend towards brown. Because your colours will always be tending towards greys and browns the trick is to control the colour.
Do not add black, this tends to deaden the colour, instead mix carefully, sometimes a tiny amount of one colour will make all the difference. Viridian green mixed with Alizarin Crimson can make a good black when mixed in equal measure.
There are also some very nice earth pigments that can be used, such as burnt umber, yellow ochre, raw sienna, these are all worth trying and using in mixtures when you are trying to get the correct colours for your specimen.
Leaves
The surface area of a leaf is called the blade, it is usually thin and flat to maximize their exposure to the sun. The cuticle is the outermost skin around the leaf, it is usually waterproof to reduce water loss and has cells which act as lenses to direct incoming light.
The vein that runs through the middle is the midrib and the outside edge is the margin and can be smooth, serrated or spiny. It is important to look closely at these separate parts of the leaf because it can be the subtlest detail, say the difference in the shape of the tip or the width of the middle, that can make a significant difference from another leaf.
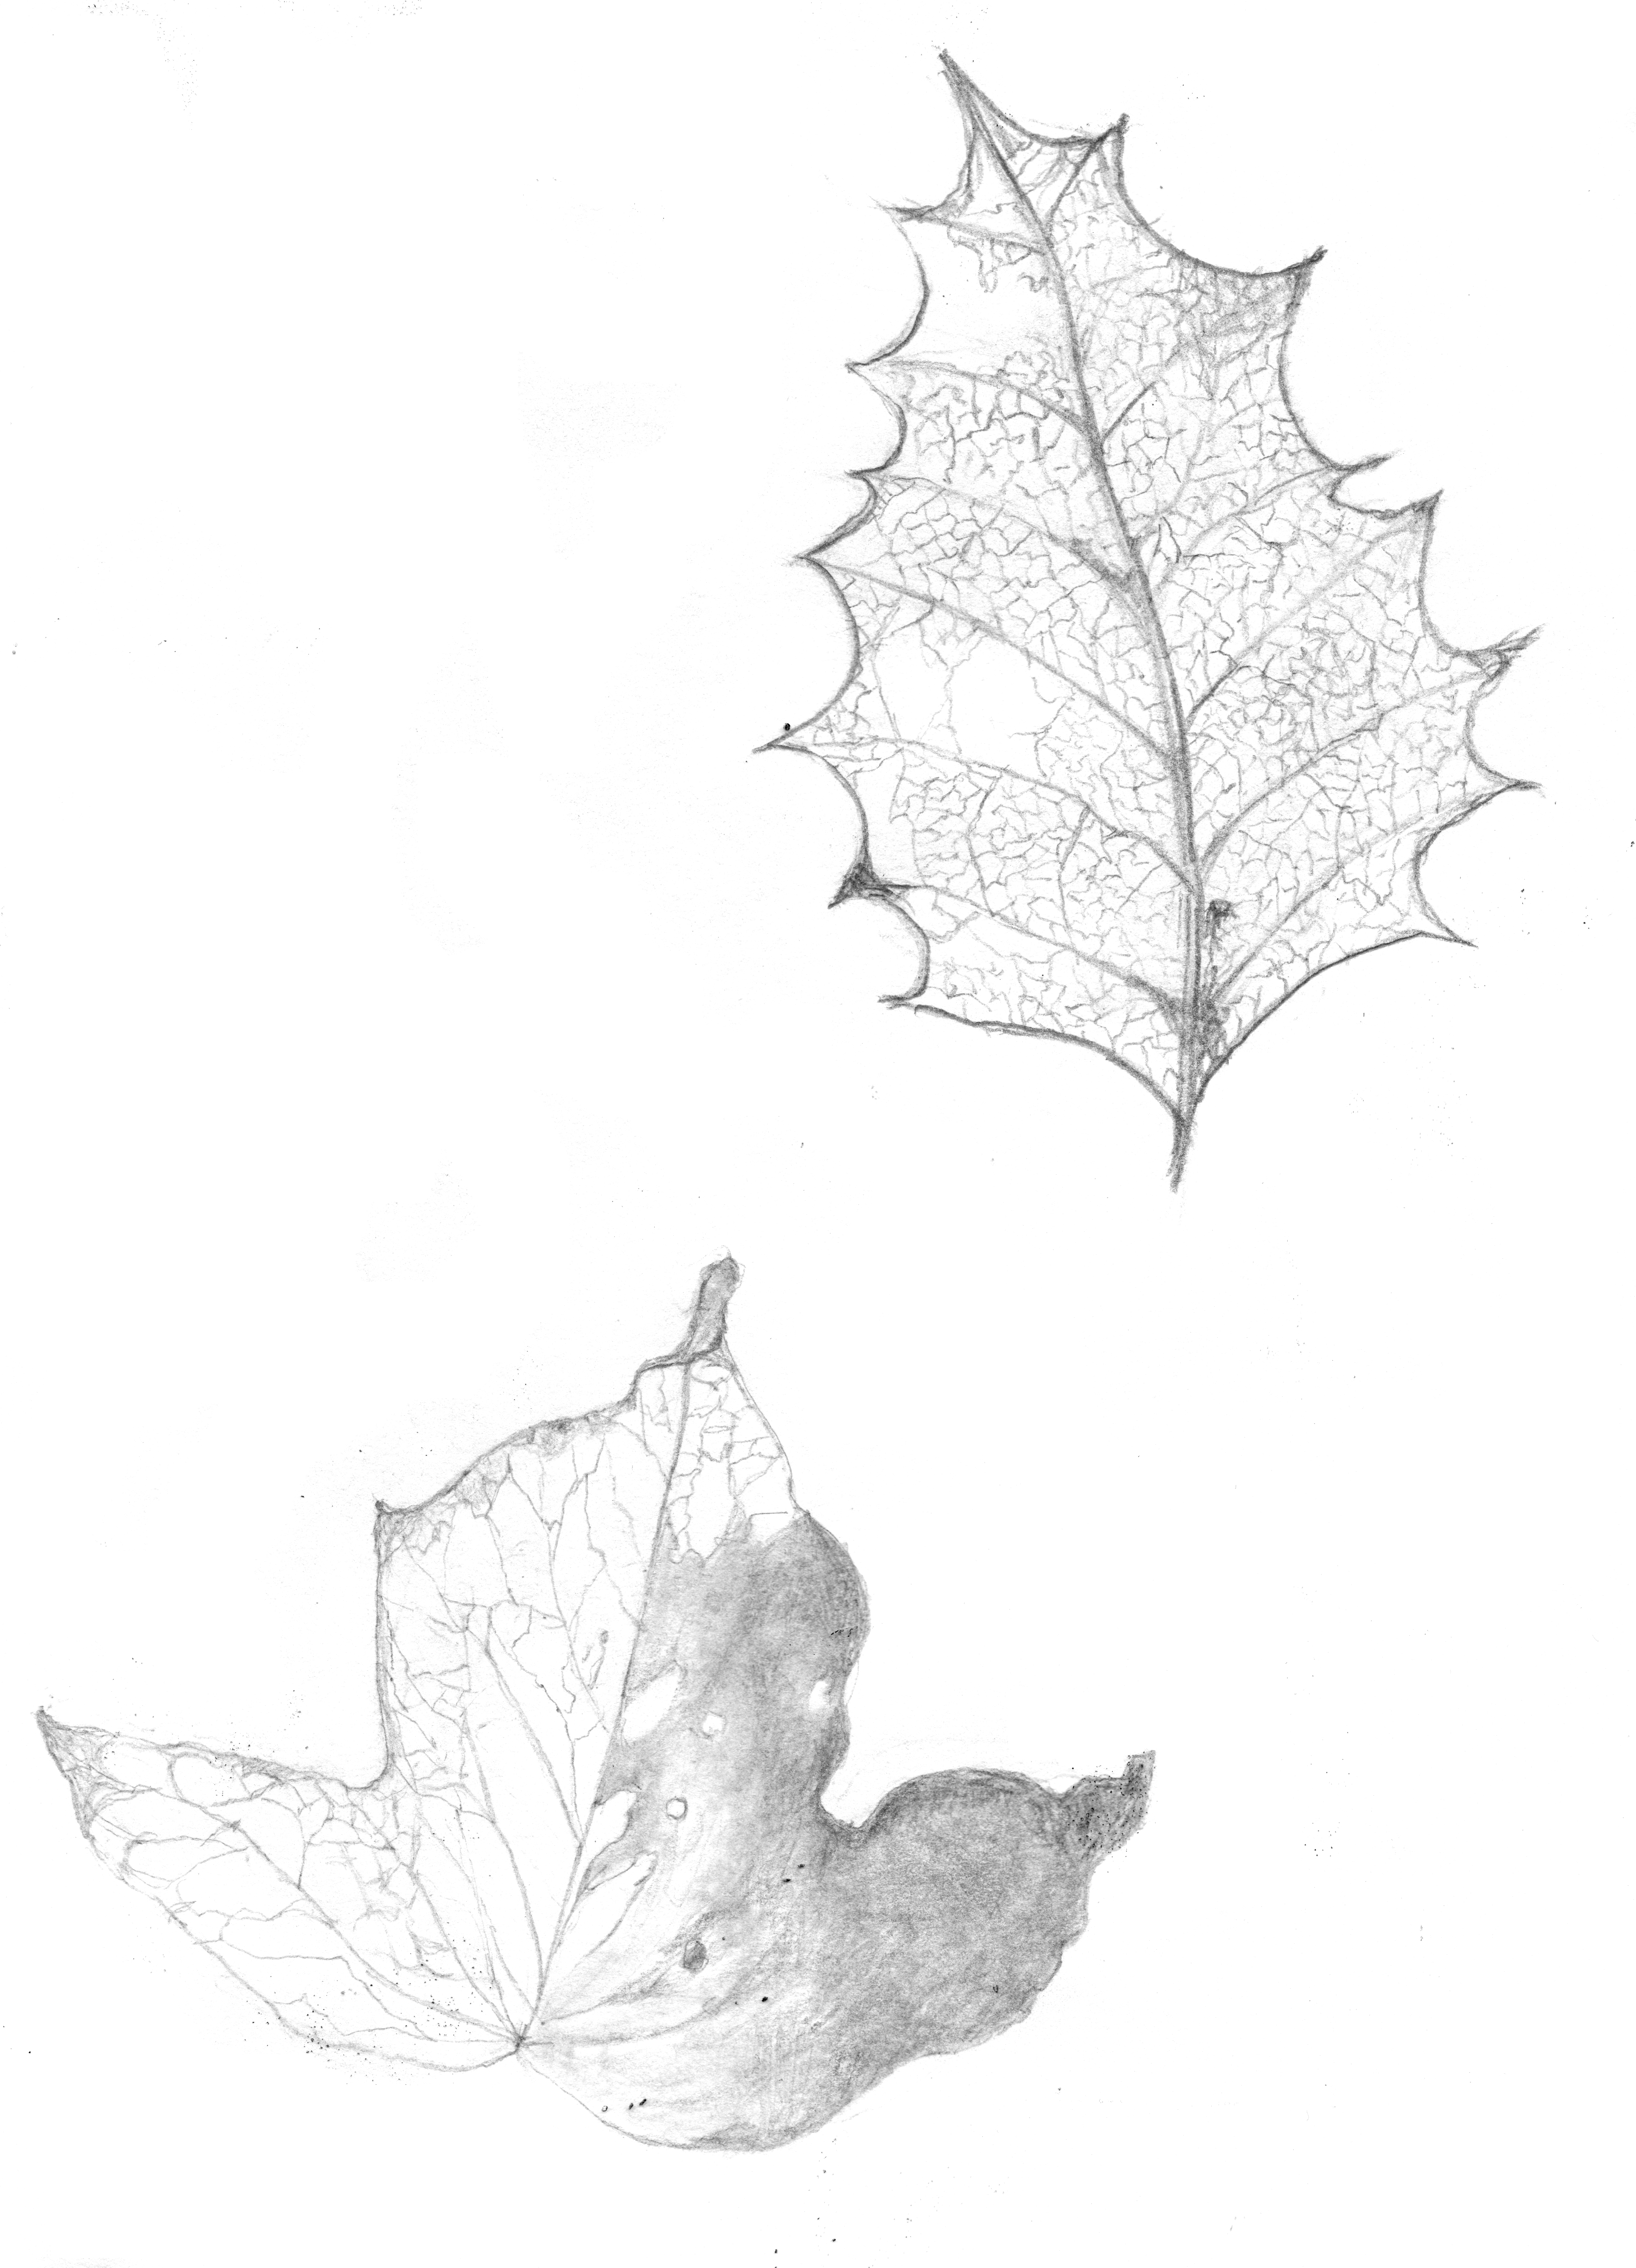
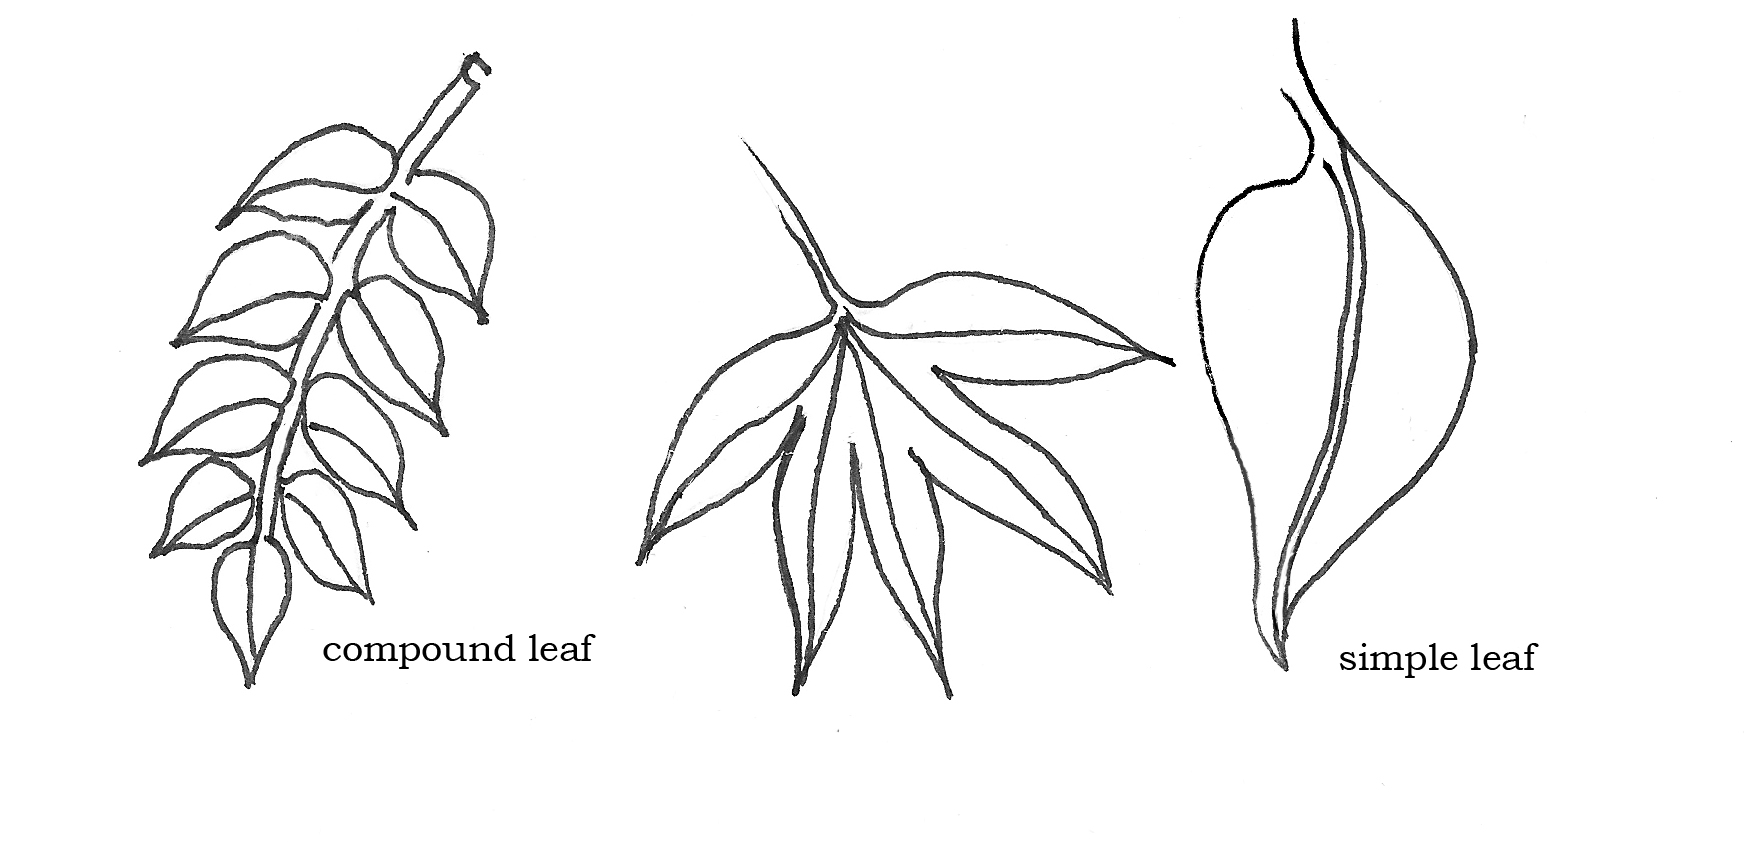
The job of a leaf is to get sun in order to photosynthesis. The veins in the leaf are directly connected to the veins in the stem so that the leaves can be supplied with water and minerals for photosynthesis and the sugars produced taken away to feed other parts of the plant. I found some leaf skeletons recently, of Holly and Ivy, they show the veins running through the leaves beautifully. Holly and ivy leaves are both what are known as simple leaves with reticular vein patterns. A reticular vein pattern is when the veins branch off from the midrib and carry on branching to make net like patterns across the leaf, as the Holly leaf skeleton I’ve drawn shows clearly.
Compound leaves are leaves that are divided into separate sections called leaflets, each section looking like a small individual leaf. Each leaflet is attached to the same midrib and stalk. Common examples are the horse chestnut or the ash.
The undersides of leaves have tiny pores called stomata through which carbon dioxide enters and oxygen is released.
Some plants don’t have a reticular vein pattern, they instead have a parallel pattern, the veins run in straight lines parallel to each other. This is less common in trees but can be seen in the palms. The pattern of leaves inside trees is called venation
The type of leaf a tree has depends on its species and the growing conditions.
Plants growing in tropical forests usually have leaves all year round and these leaves are large to capture enough sunlight within the dense forest. Trees such as pines are designed to live in high exposed areas and need to be tough enough to withstand sun, rain and wind, so they have thin needles to help withstand such extremes.
When I draw a leaf I start by using a light pencil such as an H or HB draw in the stem and the midrib of the leaf. This gives me the general direction of the leaf.
Next I draw the outline of the leaf, but I don’t put in the detail yet, I concentrate on getting the general shape. I take time to consider where the widest part of the leaf is, how long it is compared to how wide it is, the shape of its tip, the shape where it joins the stem. I see all of these as of equal importance and overlooking one aspect can ruin a drawing.

The look of a leaf can be totally changed by very simple differences, such as in the picture below where the only difference between the leaves is the point at which they are widest. I am very tempted to look down a magnifying class at the many tiny veins that branch off, but to attempt to draw all these would clutter the picture and show more than what can be normally seen
Tone

Tone is how light or dark something is. It is created by light hitting an object and ranges from the darkest black shadow to white with many shades in between. When drawing it is the differences in tone that give something a 3 dimensional appearance. One way to determine the tones of an object is to squint as it, this prevents you from seeing so much of the colour and allows you to see the tones a little more clearly. When drawing it is important to use the full range of tones, using the white of the paper for the brightest highlight and layering pencil marks to get the darkest shades you can for the very darkest shadows. A tonal strip test can be very helpful before you start a drawing, allowing you to see the full range of tones you can get.
Tonal Strip Test
Draw 10 squares across your sheet of paper. Leave the first square white. In the next square shade it with your pencil as lightly as you can manage. The next square get a little bit darker. Carry along the square getting gradually darker, pressing harder with the pencil, layering up the marks, hatching in different directions until your final square is almost black (see diagram below)
After you have done this with one pencil, try it with another so you get a clear idea of the different tones you’ll get with each pencil. Perhaps start with an HB, then try a 2B and then a 2H so you can see the difference.
Shading
There are many ways to shade, the two commonly used are hatching and cross hatching. Hatching is lines going in one direction, cross hatching is lines going over hatching in the opposite direction.
There is also non directional shading, with is most commonly used when drawing nature. I find pencil shading works best if I follow the contours of the object I’m drawing, this helps give it shape and not flatten in out as straight hatching often can do. Smudging shading with your fingertip or a smudge stick can also be very helpful for blending different shades subtlety along a surface.
Mark making
Many marks can be made with a pencil, and with all the different skins, barks, textures in nature that is just as well. Takes a new piece of A4 paper, lie it width ways, and experiment with all the different marks you can make. Check your pencil is sharp before you start. Try u. sing the pencil on the side of its lead, dotting quickly hardly leaving a mark, overlaying. Try long strokes holding the pencil loosely as the end, then very tight fine strokes, try circular directions, pressing hard and pressing very lightly, drawing fast and drawing very slowly. Carry on until you have filled the whole page.
Quality of your line
As you work it is important to consider every line you draw, don’t just scribble vaguely, think about what it is you are drawing and which best line to use as you draw.
Rubbing out is another way of mark making, and very good for using for highlights. Try making more marks with your pencil and then rubbing parts of them out with a rubber to see what different effects you can get.
Equipment
Sketchbook A5
A set of pencils ranging from 4H to 5B
A pencil sharpener
Rubber
Smudge sticks (see below)
For indoor sketching at home an angle poised light is useful.
Larger sheets of good quality paper for more finished drawings.
A set of good quality coloured pencils.
A small set of Watercolour paints
It is here where I should mention an important point about buying art materials, buy good quality, the best quality you can afford. If something is cheap and is called “students” it is of poor quality. On the other hand it is important to remember that it doesn’t matter how much expensive equipment you buy if you can’t draw you can’t draw and it is only practice that will change this!
A camera is an exceedingly useful tool. When starting to sketch a subject it can be useful to take photos as well so you have a range of references for a finished drawing. Do not however rely solely on the camera. A photo is a photo, it is not the thing itself.
Pencils
Graphite pencil ranges from very hard which is useful for establishing detail to very soft which is good for establishing dark tone.
Pencils are used for many things from creating sketches and plans to producing beautiful fully finished artworks.
Blenders or smudge sticks are very useful when drawing with pencils, rolled up and compressed paper is used to make a paper stump, these are available in a variety of sizes. Cork can also be used to smoothen pencil lines.
Rubbers are another vital necessity, a kneaded rubber can be used, as the surface of the rubber gets soiled it can be kneaded to absorb the excess graphite. Regular rubbers can be chiseled with a knife or broken into smaller parts to use for details. Pen rubbers are also very useful for details.
When choosing paper for a graphite pencil drawing you want to choose something that is reliant and not easily damaged. Hot press Watercolour paper is really too soft for much pencil drawing and erasures, it’s surface will get easily damaged. Choose a good quality of white cartridge paper for drawing in pencil.
Colour pencils include non-water soluble, water soluble and waxed based varieties. Colours can be mixed by layering the pencils marks on top of each other. Soluble colour based pencils are often used with watercolour paints to give a variety of effects. The great advantage to using colour pencil as opposed to paint is that it is much easier to use outside, no water or palette being needed.
Paints
When buying paints do not use student quality. This usually means that less pigment has been used and more additive has been put in to make the paint go further, this does not produce good colour and you are much better off going for a professional quality.
Watercolour paints are what is traditionally used for botanical illustration. They are translucent, which means they show through to the white of the paper, wonderful effects can be created once you get the hang of using the white of the paper instead of white paint. Because of its translucent quality and the fact that you cannot rub out watercolour like you can pencil, it is best to paint always from light to dark, start painting your image very lightly and gradually get darker. When doing a watercolour it is a good idea to trace a basic line drawing faintly on to watercolour paper using either tracing paper or a light box. Also if you think you are going to use a fair bit of water, doing large washes etc, it is a good ideaa to stretch the paper before use.
Gouache is similar to watercolour except it is opaque. This means that you can paint lighter colours on top of darker ones. However this should be used wisely, a white flower painted with white gouache paint often looks clumsy, far better to use watercolour and the white of the paper.
Acrylic is a paint commonly used these days. I was trained in oil paint so I find acrylic a little lacking in quality, feel and colour. Still it is very good for murals and other things that require a toughness.
Oil paints are a lovely medium, but really requires space. It can be very messy, is difficult to get out of clothing (though no more than acrylic) and takes a very long time to dry. Also the thinners and substances used to clean off brushes is horrible, either it is turpentine or white spirit, either of which are damaging to the environment, or it is citrus based solvents such as Zest it which is good but has an overpowering smell. I wont be dealing with oil paint or acrylic here, but the rules to things like colour theory, texture, tone and composition are very much the same throughout.
